
Easy Shoe Cake (Sneaker Cake)
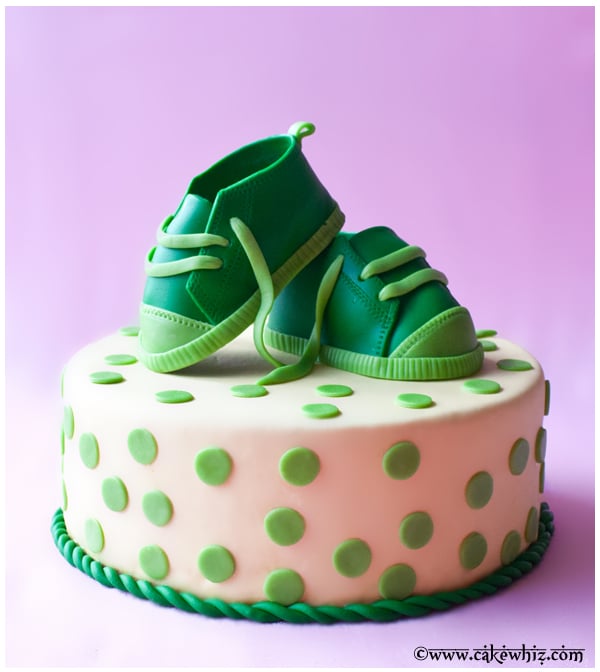
Easy shoe cake or sneaker cake with step by step tutorial and template. This fondant baby shoes topper is perfect on round cake decorated with fondant and gum paste. Serve at baby showers or kids birthday parties.
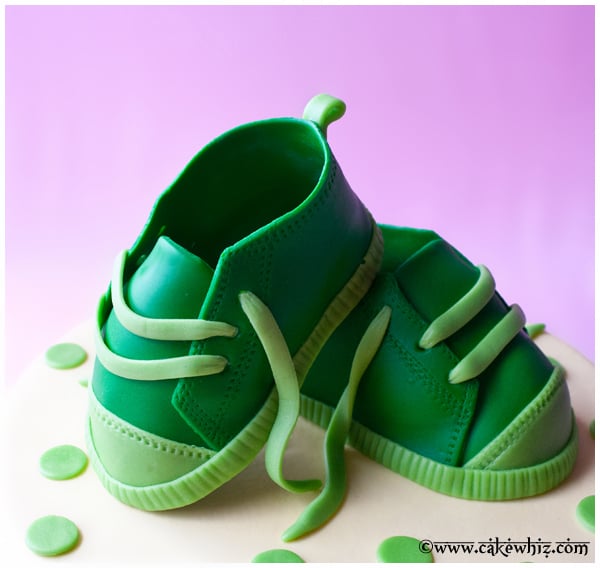
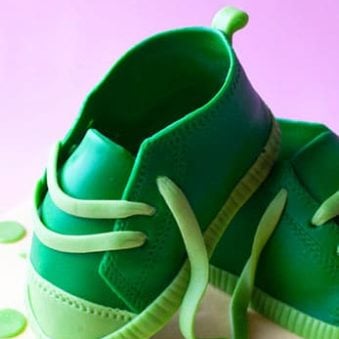
Based on my research, there are two types of shoe cakes. The first one is carved and decorated to look like a shoe. The second one is a round or rectangle cake with fondant sneaker toppers. Between those two, the second one is definitely the easiest because there is no carving involved, which requires a lot of practice. These toppers ended up looking very similar to Converse sneakers. If you found this cake cute, then you need to check out this Crying Baby Cake and this Twins Cake.
How to make shoe cake (sneaker cake)?
- Bake cakes– Green pistachio cake was perfect for this color theme.
- Let them cool- Until room temperature.
- Make icing- American buttercream frosting was the classic pairing.
- Assemble– Place cake on cake stand or cake board, ice it, place other cake on top, ice entire cake smoothly.
- Decorate- Cover cake in yellow fondant and stick green polka dots and green rope around the base.
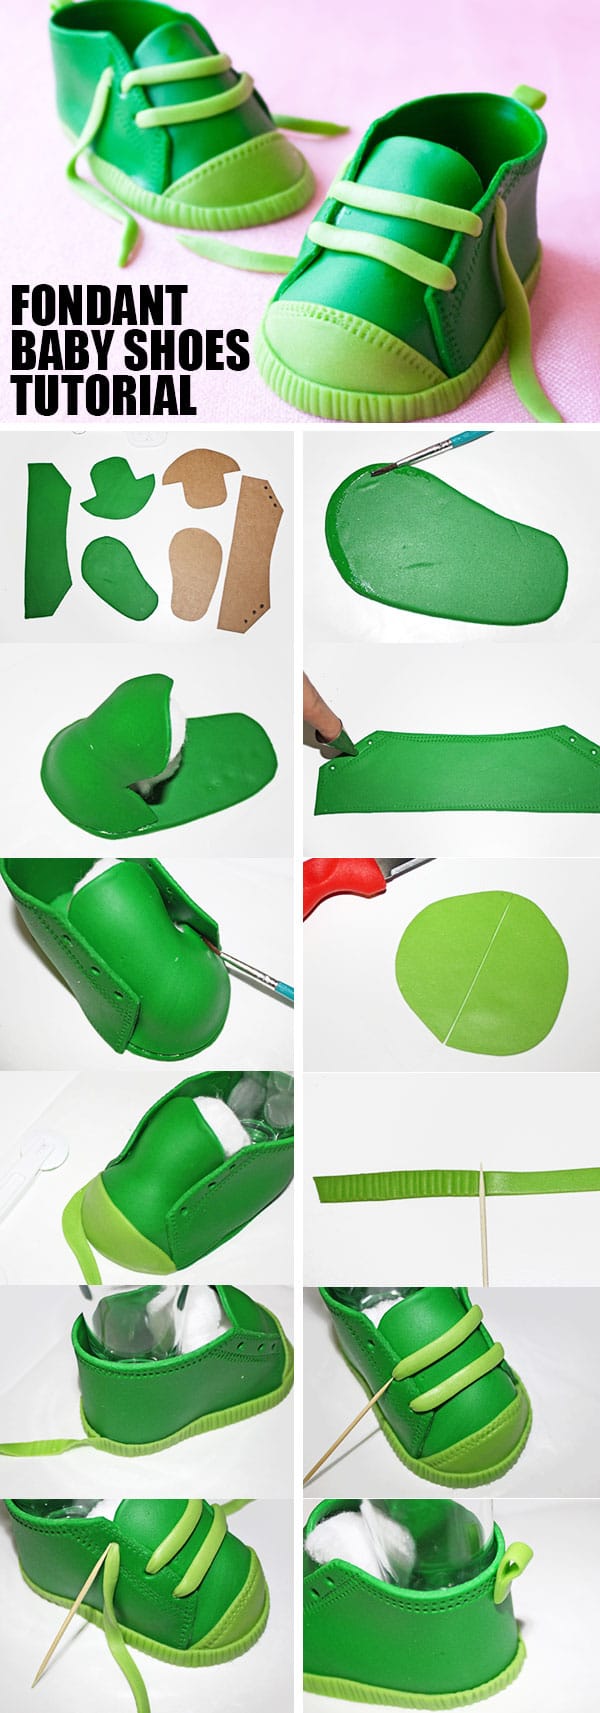
- Make edible gum paste/fondant shoes- Use a template.
- Let it dry– Until firm.
- Final decoration– Place toppers on top of the cake.
How to use fondant baby shoes template?
- Print template on thick paper.
- Use scissors to cut out all the individual pieces.
- Use them as a guide to cut out relevant gum paste/ fondant pieces.
- Assemble the pieces into the shape of a shoe, using corn syrup as glue.
- Please note that you can save this template on your computer, resize it and print it it to your size requirements.

Variations
Use other colors- This cake had a neutral theme with two shades of green but you can use any colors you like.
Turn this into a gender reveal cake- Make pink sneakers for girls and blue sneakers for boys. You can also color the cake batter and frosting in the relevant colors.
Try other cake flavors- Such as Easy Rainbow Cake or Moist Red Velvet Cake.
Try other frosting flavors- Such as Mango Frosting or Orange Frosting.
Flavor fondant- Use extracts. Make sure the extract compliments the cake and frosting flavors. Also, use clear extracts if you are coloring white fondant to prevent discoloration.
Decorate with jumbo sprinkles- Instead of cutting out fondant polka dots, use store-bought jumbo sprinkles. Stick them to the cake with frosting or melted white chocolate.
Make a tiered cake- Add a larger tier at the bottom. Be sure to use dowels for support.
Fill cake- With jams and preserves, Homemade Caramel Sauce or Dulce Del Leche or nut butters. You can also add fresh berries or chopped up nuts or candy bars.
Make mini shoes- To decorate cupcakes. Just resize the template to the relevant size. The rest of the steps are the same.
Tips and Techniques
Do you use fondant or gum paste to make shoes?- Use 50/50 (combination of half fondant and half gum paste) because it does not dry as fast as gum paste. You can even make 70/30 (70% gum paste and 30% fondant). If you use gum paste only, the pieces start drying quickly, which means you will have to work quickly and and it’s really difficult to fix mistakes. I don’t like using only fondant because it takes very long for the shoes to dry. Also, fondant is softer than gum paste, which makes assembling the shoe very difficult because the pieces don’t hold their shape well.
Don’t frost or decorate warm cakes- Because the warmth will cause the icing and fondant to melt and make a sticky mess.
Homemade fondant vs. Store-bought fondant- Both work well. Store-bought fondant is obviously convenient and it can also be bought pre-colored but homemade version tastes amazing.
Use gel colors for coloring fondant and gum paste- This works much better than liquid colors because gel colors are thicker and more concentrated and will not make the fondant or gum paste wet and sticky.
Use very little water for sticking pieces- Because if a lot of water is used, it can cause the dark colors to bleed into the light colored fondant and make it messy. It can also make fondant very sticky.
Use support for sneakers– If they are heavy, they will dig into the cake. You can use bubble tea straws for support.
Use wax paper- Make this entire shoe on a sheet of wax paper because it prevents the pieces from sticking to your work surface.
Drying time for shoes may vary- Because this depends on the humidity and moisture in the air of where you live. Too much moisture and humidity = Slower drying time. Speed up the drying time by place a table fan pointed directly on the shoes.
Use thick scrapbook paper when printing template- Because it’s firmer and holds its shape better when you use it as a guide to cut out relevant fondant/ gum paste pieces.
Storage
Room temperature- Decorated cake can be left at room temperature for 24 hours as long as there is no perishable filling that requires refrigeration.
Refrigerate- Leftovers can be stored in a sealed container in the fridge for up to 3 days. However the fondant decorations will become slightly sticky and tacky from the moisture in the fridge.
Freeze- Unfrosted cakes and frostings can be stored separately in a sealed container for up to 1 month. When you are ready to enjoy it, let it thaw in the fridge overnight and then, decorate as per instructions below.
Make ahead instructions- This cake can be baked and decorated 1 day in advance and stored at room temperature until you are ready to serve.
More Decorated Cakes
- Erupting Volcano Cake (With Dry Ice Smoke)
- Easy Monster Cake
- Peacock Cake
- Butterfly Cake
- Bumblebee Cake (Spring Cake)
- Fondant Basket Cake (Basketweave)
Easy Shoe Cake (Fondant Baby Shoes)
Ingredients
- 2 Pistachio cake Use this recipe to make 2 round cakes. Dimensions: 8×2 each.
- 4 cups American buttercream frosting
- 4 cups Marshmallow fondant Yellow, Dark green, Light green, For covering and decorating cake
- 3 cups Gum paste Or 50/50 (equal combination of fondant and gum paste), Dark green, Light green, For making shoes
- 2 tbsp Corn syrup For sticking pieces
Instructions
- Bake cakes and allow them to cool completely.
- While cakes are baking and cooling, prepare frosting.
- Place one cake on a cake board or cake stand and use a spatula to spread icing on top.
- Place the other cake on top and press gently to secure into place.
- Use a spatula to cover the entire cake smoothly in frosting.
- Roll out yellow fondant.
- Spread it over the frosted cake and cut off excess along the base with a pizza cutter.
- Roll out dark green fondant into two long ropes and intertwine them.
- Stick this rope around the base of the cake with some water.
- Roll out dark green fondant and use a small circle cutter to cut out round shapes.
- Stick them randomly all over the cake with some water.
- Keep this decorated cake aside as you work on the shoes.
- Print the shoe template on thick scrapbook paper. You can resize the image in Photoshop and make it bigger or smaller depending on how big or small you want the shoe to be.
- Roll out dark green 50/50 or gum paste and cut out all the relevant shapes with a knife or pastry cutter.
- Use the quilting tool to create stitch marks on Piece A.
- Use Wilton's Tip#3 to cut out three little circles around either side of Piece A. Keep aside.
- Place Piece C on a sheet of wax paper and brush corn syrup halfway around the top edge.
- Stick Piece B on top of the corn syrup. Fill the hollow space with crumpled tissue so that this piece holds its shape.
- Brush corn syrup around the remaining edge of Piece C.
- Stick Piece A on top of the corn syrup.
- Brush some more corn syrup along the sides of Piece A so that it sticks to Piece B. Use your fingers to smooth out the joint where Piece A is glued to Piece B.
- All this pressing and sticking of pieces makes the base of this shoe spread a little. To fix this, cut any excess near the back of the shoe.
- Fill the hollow space inside the shoe with tissue paper or a small plastic glasses.
- Roll out light green gum paste and use a large circle cutter to cut out a piece. Then, use a knife to cut it in half.
- Brush corn syrup on the front of the shoe and place this light green piece until it sticks into place. Smooth it out with your fingers and cut excess with a knife.
- Use the quilting tool to create stitch marks of top of the light green piece.
- Now, cut out a long strip of light green gum paste and press a toothpick all over the strip until you have vertical indentations.
- Brush corn syrup around the base of your shoe and stick the green strip. Cut excess strip and smooth the joint with your fingers.
- Most sneakers have a small loop near the back. To make this, cut a light green strip of gum paste and bend it into the shape of a loop and stick it at the back of the shoe with corn syrup.
- To make laces, use a clay extruder with a rectangular plate and push out strips of light green gum paste. Brush corn syrup in the holes. Then use a toothpick to push the laces into the holes. They don’t have to go all the way in but it should still look like the lace is inside the hole.
- To make the hanging laces, brush corn syrup in the holes and use your clay extruder to make 2 long strips and push each strip into the final hole and then let them just hang.
- Your shoe is ready. Allow it to dry for 24- 48 hours.
- Repeat these steps for the other shoe.
- Once dry, place the shoes on top of the decorated cake.
Nutrition
The post Easy Shoe Cake (Sneaker Cake) appeared first on CakeWhiz.